Search This Blog

Wednesday, January 28, 2009

I finally found the time to finish my FolderVisualizer application. To recap: FolderVisualizer draws a Tree Map of a selected folder which makes it easy to see which folders/files take up the most space. You can also delete these folders from within the application. I started this project with a colleague to do a comparison between Adobe Air and JavaFX.

Version 2.0.0RC1 is down-loadable from the project's website. The following screenshot gives an impression of the application:
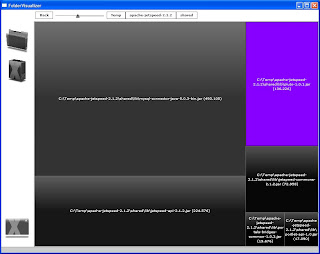
The application implements the following functionality:

  • Select a folder which must be visualized in the tree map

  • drill down to other folders

  • change the number (density) of the folders in the tree map

  • provide a breadcrumb navigation path for easy navigation

  • Delete the selected folder/file

  • Visual effects when changing view stacks

  • More appealing theme/colors than the previous version

Version 2 is a complete rewrite of the whole application. Because a lot of new functionality is added, I restructured the application to make it more maintainable and transparent. As a guideline, I used the principles of MVCS, which is basically a set of design guidelines to implement the Model View Controller Service architecture in Flex applications. It is NOT a framework unlike for example Cairngorm. I Used Cairngorm on another project but I had the impression that the framework gets in your way. I found myself writing to much boilerplate code like commands, custom events, controllers etc. I'm NOT saying that Cairngorm is a bad framework, but I found it to complicated for the task at hand: structuring a Flex application in a well defined matter.

On the other hand, I really like the clarity and simplicity of the MVCS approach and the freedom to adapt the principles to your application's needs. The FolderVisualizer application consists of a couple controllers, a model class which contains references to the application's model objects, a FileService and components which make up the view. To handle user interaction, I used the event bubbling approach. In the event bubbling approach, when the user clicks on a button, a UIEvent is dispatched. This event "bubbles" up to the parent who handles it, usually a controller. This controller is responsible for handling the business logic associated with this specific user action. Consider the following example, taken from the FolderVisualizer application:
<?xml version="1.0" encoding="utf-8"?>
<mx:HBox xmlns:mx="http://www.adobe.com/2006/mxml">
<mx:Metadata>
[Event(name="uiEvent",type="nl.foldervisualizer.events.UIEvent")]
</mx:Metadata>

<mx:Script>
<![CDATA[
... Some code omitted

[Bindable]
public var model : Model;

private function handleBack(event:Event):void {
dispatchEvent(new UIEvent(UIEventKind.BACK))
}

... Some code omitted
]]>
</mx:Script>

<mx:Spacer width="5"/>
<mx:Button label="Back" click="handleBack(event)"/>
... Some code omitted
</mx:HBox>
The above code is taken from the NavigationControlBar.mxml which implements the navigational actions a user can perform. When a user clicks on the back button, a UIEvent is dispatched of kind UIEventKind.BACK. Also note that this component defines an event "uiEvent" which parent containers can use to add an eventListener which listens for UIEvents. See the following code-snippet taken from FolderVisualizer.mxml, which is the parent container of the NavigationControlBar:
<?xml version="1.0" encoding="utf-8"?>
<mx:HBox xmlns:mx="http://www.adobe.com/2006/mxml"
xmlns:toolbox="http://www.flextoolbox.com/2006/mxml"
xmlns:view="nl.foldervisualizer.view.*"
xmlns:controller="nl.foldervisualizer.controller.*"
xmlns:model="nl.foldervisualizer.model.*"
creationComplete="handleCreationComplete()">

... Some code omitted

<!-- Controllers used in the application, could also use dependency injection here (for example Prana) -->
<controller:AppController id="appController" model="{model}"/>
<controller:NavigationController id="navController" model="{model}"/>

<view:ControlBar width="100" height="100%" uiEvent="appController.handleUIEvent(event);"/>

<mx:VBox width="100%" height="100%" verticalGap="0">
<view:NavigationControlBar height="35" width="100%" verticalAlign="middle" horizontalAlign="left" horizontalGap="0" model="{model}" uiEvent="navController.handleUIEvent(event);"/>
... Some code omitted
</mx:VBox>
</mx:HBox>
As you can see in the above code, the navController.handleUIEvent method handles all UIEvents dispatched from the NavigationControlBar. One way to handle the events in the handleUIEvent method is the use of a switch statement. For every UIEventKind which the controller must handle, a separate case in the switch statement is used which calls the correct method. Consider the following example:
public function handleUIEvent(event:UIEvent) : void {
switch (event.kind) {
case UIEventKind.BACK:
// handle event
break;
case UIEvent.SHUTDOWN:
// Handle event
break;
default:
trace("No event handler defined")
}
}
What I don't like about this implementation is the excessive amount of switch-case code to handle the events. For every controller in your application which must handle UIEvents, a switch block must be implemented. Instead of using a switch block, I used a different approach for handling UIEvents in controllers. I implemented a MultiActionController which acts as a base class of all controllers which must be able to handle UIEvents. The following code snippet comes from the MultiActionController (some code omitted):
public class MultiActionController extends BaseController
{
/**
* Mappings between UIEvent.kind (see UIEventKind) to functions. Those functions are defined in
* the subclass.
*/
protected var _handlerMappings:HashMap = new HashMap();

public function MultiActionController()
{
super();
}

public function handleUIEvent(event:UIEvent) : void {
var funct:Function = _handlerMappings.getValue(event.kind)
if (funct==null) {
trace("No function for [" + event.kind + "] is defined in the handlerMappings. Make sure you define this event to function mapping in the constructor of you base class. See the ASDocs of the MultiActionController.")
throw new IllegalOperationError("No function for [" + event.kind + "] is defined in the handlerMappings. Make sure you define this event to function mapping in the constructor of you base class. See the ASDocs of the MultiActionController.")
}
funct.call(this, event)
event.stopPropagation()
}
}
The MultiActionController defines a _handlerMapping variable of type HashMap. This hashmap contains the mapping between UIEventKind and functions (functions are objects in ActionScript 3). When the handleUIEvent is called, this method looks up the function belonging to the UIEvent.kind property. If this function exists, it is called passing the UIEvent as a parameter and stops propagation for this event. Otherwise an IllegalOperationError is thrown. Now take a look at the NavigationController which extends MultiActionController:
{
public class NavigationController extends MultiActionController
{
private var _model:Model;

public function set model(model:Model):void {
_model = model
}

public function NavigationController()
{
super();
super._handlerMappings.put(UIEventKind.BACK, this.handleBack)
super._handlerMappings.put(UIEventKind.DIRECT_LINK, this.handleDirect)
super._handlerMappings.put(UIEventKind.DENSITY_CHANGE, this.handleDensityChanged)
super._handlerMappings.put(UIEventKind.DRILLDOWN, this.handleDrilldown)
}

private function handleBack(event:UIEvent):void {
... Do actual work here
}

... Some code omitted

}
}
The constructor of the NavigationController defines the mappings between the UIEvents this controller handles, and the corresponding functions to call. As you can see, there is no need to write blocks of switch statements in every controller to handle UIEvents. Just define the mapping between the UIEvents and functions in the constructor of the corresponding controller. One thing to be aware of is that all functions that are called by the MultiActionController accept a single argument of type UIEvent. This should not be a problem because the only way to call these functions is by dispatching a UIEvent. The UIEvent.payload property should contain all data required for the function to do its work.

Note that this is NOT a framework but an implementation variant of the MVCS principle for handling UIEvents. Feel free to use this code in your own project.

Conclusion

Structuring and organizaing a Flex (and any other!) application gives you the following benefits:

  • easier to maintain the application

  • easier to extend the application with new funcitonality

  • easier to test the application

  • easier to understand the application for new team members

  • ...

Implementing the principles of the MVCS approach is an effective way of organizing and structuring Flex applications. The principles of MVCS are not restricted to a particular implementation. Instead, they can be implemented in various ways that best suites the needs of your application. In this post, I showed you a variation of handling UIEvents which reduces the amount of code necessary to handle these events. When you work on moderate to large Flex applications, have a look at the MVCS guidelines to structure the application. The time you invest does get pay back. The complete source code of the FolderVisualizer application can be found here.

One final note: although I did not use a DI framework, for example Prana, using a DI framework can be an effective way to decrease the coupling between components and increase testability. At the moment, my DI framework of choice for Flex applications is Prana.

Resources

Folder Visualizer
MVCS
Tree map component

Tuesday, January 20, 2009

text-image-generator example

As a follow-up on my previous post, here is an example of how to use the text-image generation library. Consider the following code:

TextImage testImage = new TextImageImpl(400, 250, new Margin(0, -5));

// Declare or read the fonts you need
Font header = new Font("Sans-Serif", Font.BOLD, 15);
Font plain = new Font("Sans-Serif", Font.PLAIN, 12);

// Read in any images you need
InputStream is = Test.class.getResourceAsStream("/warning.jpg");
Image warning = ImageIO.read(is);
// Put close() in try-finally block with production code!
is.close();

// 1. specify font and write text with a newline
testImage.useFont(header).writeLine("Example usage text-image-generator.").newLine();
// 2. enabled the wrapping of text and write text which is automatically wrapped
testImage.useFont(plain).wrap(true).write("This is an example of how to use the text-image generation library. With this library you can dynamically generated textbased content as images (png or jpeg). Notice how this sentence is automatically wrapped. See the code at http://code.google.com/p/textimagegenerator/ for more examples.").newLine();

// 3. Disable text-wrapping again. Write underlined text.
testImage.wrap(false).useColor(Color.BLUE).useFontStyle(Style.UNDERLINED).write("This line of text is underlinedand blue.").useFontStyle(Style.PLAIN).newLine();
testImage.writeLine("You can also embed images in your generated image:");
// 4. embed the actual image. Here we use absolute positioning
testImage.write(warning, 175, 175);

// 5. Write the image as a png to a file
OutputStream os = new FileOutputStream(new File("example.png"));
testImage.createPng(os);
os.close();

The code above generates the following image:


The text-image generation code can be downloaded at http://code.google.com/p/textimagegenerator/. Here you will find more examples of how to use this library. Hope you enjoy.

Tuesday, January 13, 2009

Creating Dynamic Images with Java and GridGain

At my current client we have a requirement to dynamically create images with a specific text, for example an authorization code. These images are created in Java and encoded as a PNG file. For the generation of text based images I created a library which is available on Google Code, see [1]. These images are generated by a servlet of which the URL is embedded in the HTML as an image tag or in a background of a div element.

During performance tests I saw that the generation of images is a very CPU intensive task. Because there are a lot of users who request a dynamically generated image, this functionality can cripple the CPU's which has a negative impact on the throughput and the stability of the system. Because this is a specific, CPU intensive task, it is a perfect candidate to off-load this process to another machine so the CPU intensive task is distributed over a number of machines.

One way to distribute the processing of CPU intensive tasks is to use the open source grid computing platform GridGain. GridGain is "an open source computational grid framework that enables Java developers to improve general performance of processing intensive applications by splitting and parallelizing the workload." See also [3]. Image generation is a perfect candidate to distribute with GridGain.

I have created the following setup to do some first tests with GridGain in this specific scenario:

  1. Created a web application with a servlet which is called by clients. This servlet is responsible for executing the image generation task on the grid and streaming the result back to the client as a PNG.

  2. Created a GridGain task which creates a job which is responsible for the actual image generation. This job can be executed on any of the nodes participating in the grid.

  3. Used two physical nodes in my first setup, node 1: PentiumM 2 GHz with 2 GB's RAM, node 2: Pentium4 2.2 GHz with 1 GB RAM.

  4. Used Apache JMeter to create a load test [4].


See the following diagram for an overview of my setup:


I used 5 concurrent threads (users) in my JMeter script with a ramp-up time of 0ms which means all 5 users are active at once.

  1. My first test run was used to create a baseline. This version did not use the grid at all and the image generation logic was implemented directly in the servlet. This test was run on node 1. With a couple of tests there was an average of 6.7 transactions per second.

  2. My second test was used to determine the overhead of the grid. I expect the throughput to be a little less than in my first test. The same node was used as in 1. With a couple of tests there was an average of 6.5 transactions per second. Almost as good as without the grid. In this specific scenario the overhead of the grid is negligible. However, this can vary based on your specific situation.

  3. In my third test I added a second node, node 2, to the grid. With a couple of tests there was an average of 9.5 transactions per second. This is a throughput increase of 46%. Pretty impressive. In my test, both nodes had 100% CPU utilization.


This is really impressive considering the amount of work I had to install and configure GridGain, almost nothing. With the default configuration, GridGain uses IP multi-cast to discover all the grid nodes. I just had to start gridGain on the second node and this node automatically participated in the grid. Other strategies can be used to implement the discovery process, for example JMS topics. When a given task is executed for the first time on a given node, the grid takes care of deploying this task on that specific node. No need for manual deployment of tasks. Failover and load balancing of tasks to other nodes when a node has crashed is enabled by default. Everything is also well documented which really helps creating a consistent package.

Conclusion
Distributing CPU intensive tasks across several physical machines is an effective way to increase the throughput and reducing the risk that this process will become a bottleneck or has a negative impact on the stability of the system as a whole. GridGain is a platform which enables (Java) developers to create a computing grid and execute tasks on this grid. When you have computational intensive tasks in your application, make sure you check out GridGain.

Resources
[1] Image Text library
[2] GridGain
[3] Highscalability.com
[4] JMeter